
Child Health and Development Interactive System (CHADIS) - Instructions for Demonstration
This HOWTO will take physicians through the step-by-step process of navigating through our demonstration system to become more familiar with CHADIS.
- Get demonstration usernames and passwords
- Complete CHADIS questionnaires as a Pretend Parent
- Look at your Pretend Patient's results
- Assign followup questionnaires to the patient
- Navigating Resources on the CHADIS Report
Step One: Get demonstration usernames and passwords
If you are interested in exploring CHADIS using a demonstration version of the system, please contact Barbara Howard at bhoward@childhealthcare.org to request usernames and passwords for use on our demonstration system.
Step Two: Complete CHADIS questionnaires as a Pretend Parent
Before you ask parents to complete CHADIS questionnaires, your office must create its own CHADIS invitation for parents to use. Invitations can be designated to expire after a specified number of uses or after a predefined period of time (up to 6 months), based on the level of security and control the office desires. Once a parent is given the CHADIS invitation, s/he will create his/her own login and patients (children). (Alternatively, offices may choose to continue to create parent logins for their patients.) When a patient is created using an invitation code, questionnaires will automatically be assigned for the parent to complete based on the visit type the parent selects and the child's age. When you purchase a subscription, your questionnaire assignments are automatically set up for you according to the recommendations of The Center for Promotion of Child Development through Primary Care (see Table of Questionnaires). However, you may edit them by clicking on "view automatic assignments" from the patient search page within CHADIS.
Create a CHADIS Invitation
- To create a CHADIS invitation for parent(s) to use, login to the demonstration site using the demonstration username and password for the pretend DSM-PC staff member (see demonstration step one above) given to you by our staff.
- Click on create a CHADIS invitation.
- Select the office for the invitation. For demonstration purposes, you have access to multiple offices. In your practice, however, you may only be using CHADIS in one office in which case you will not see the 'office' field in this form since CHADIS already knows your office.
- Select the longevity of the invitation to determine how long the invitation is valid. You may also enter in a maximum number of times the invitation may be used.
- Make a note of the invitation code. If you forget the code, you can view it from your home page by clicking on the view invitations link at the bottom of the screen.
- You can now give this invitation to parents who have never used CHADIS before to complete questionnaires to assist with visits in your office. When parents use the invitation code, it will walk them through the steps necessary to create a login and new patients (i.e., their children). Once they have created a login, they will no longer need an invitation code. Instead, they will use their login to access the system.
Alternative: Create a New Patient as a Staff Member
If you would rather create the patient and parent records yourself, you can do that by following the steps below.
- To create a new patient, login to the demonstration site using the id and password for the pretend staff member (see demonstration step one above) given to you by our staff.
- Click on 'Add a patient' at the bottom of the screen.
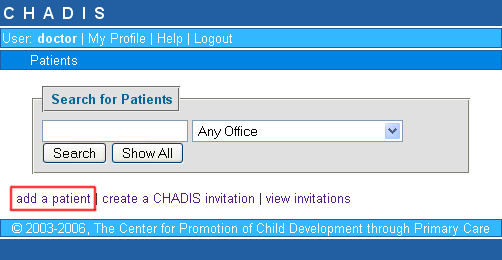
- Choose the office where the patient will be seen. For demonstration purposes, you have access to multiple offices. In your practice, however, you may only be using CHADIS in one office, in which case you will not be asked for the patient's office since CHADIS already knows your office.
- Enter the patient's demographic information and click 'Save.'
- At this point, you can choose to have questionnaires automatically assigned to the patient by clicking on that option and choosing the visit type. If you choose to purchase a subscription to CHADIS, your questionnaire assignments will be set up for you according to the recommendations of The Center for Promotion of Child Development through Primary Care (see Table of Questionnaires). However, you may edit them by clicking on "view automatic assignments" from the patient search page within CHADIS.
- If you did not choose to auto assign questionnaires or if you want to assign additional questionnaires to those automatically assigned, you can click add questionnaires under the Questionnaires section on the subsequent screen which includes details for the patient you just created.
- Add a parent (or other person who has primary responsibility for
caring for the child) for the patient by clicking 'Add new' under
the Caregivers section of the patient details to add a new parent
to the system. Remember, the user id and password for the parent so
you can login and take the assigned questionnaires. Alternatively, if the
patient you added is the child of a parent who already has a CHADIS login,
click add existing and follow the instructions.

Take the Questionnaire as a Parent
- To take the questionnaire(s) you just assigned to the caregiver
(parent) you created, login to the demonstration site. From here, you have two options:
- If you already created a respondent for this patient with a username and password, simply type in the username and password.
- If you have not created a login for the respondent yet but
have created an invitation code for your office, click
"I have an invitation code" and enter the invitation code you created
and the email and password information as requested in the "New Users"
section at the bottom of the page.
- The following screen will tell you what your login information is. Click login to begin.
- Read the instructions and click on Enroll a new patient.
- Choose your relationship to the new patient (your child) and enter your child's information.
- Choose the doctor your child is going to see.
- Choose the type of visit your child will be having.
- The next screen displays the questionnaires assigned to the new patient.
- You now have the opportunity to edit any of the information you provided about the patient. Once you are satisfied with the information displayed, click Save.
- Click on "Begin" next to each assigned questionnaire to answer the questions.
- Click on the bubble next to the answer you want to give for each question and then click continue at the bottom until you have finished.
- When you have finished a questionnarie and are satisfied with your answers to that questionnaire, click "Submit Now".
- For all questionnaires except the DSM-PC, you may stop a questionnaire in the middle and go back later to finish it. For the DSM-PC, you must start from the beginning if you quit in the middle of are away from the questionnaire for more than 20 minutes.
- If you have not yet clicked the "Submit Now" button, you may re-take a questionnarie from the beginning if you change your mind about any answers.
- When you are finished, you must submit your answers so that they can be viewed by the doctor.
Step Three: Look at your Pretend Patient's Results
- To look at your patient's results, go to the demonstration site. Enter the demonstration username and password for the doctor (see demonstration step one above) given to you by our staff.
- To find your patient, type in the last name in the "search" field and click on the search button. If there is more than one patient with that last name, you will get a list. Find your patient in the list.
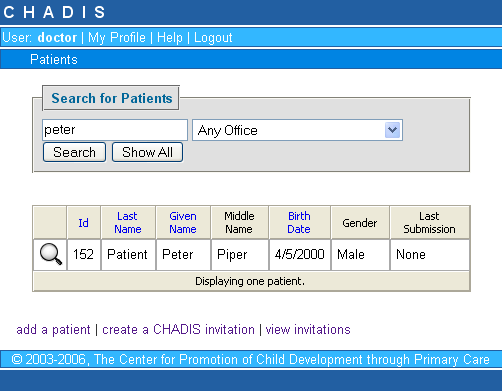
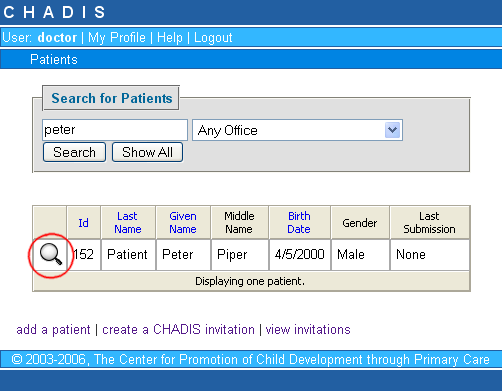
- To view that patient's information, including demographics, scheduled visits and associated caregivers, click on the magnifying glass icon to the left of the patient's name.
- Under the questionnaires section, you will see all the questionnaires
that have been assigned to the patient but have not yet been included in
any reports. Some questionnaires may have be assigned but not yet completed
(see the status column) in which case they cannot be added to a report,
yet. Others may have been started by the parent but either not completed
or not submitted. You have the option of forcing the submission of a
questionnaire by clicking on the red arrow to the left of the
questionnaire. You will receive a warning but can proceed with the
knowledge that you may not have complete information or that the parent
may not want you to see her answers yet. Once you have forced the
submission of a questionnaire, you may include it in a report. However,
it will appear as such on the report.
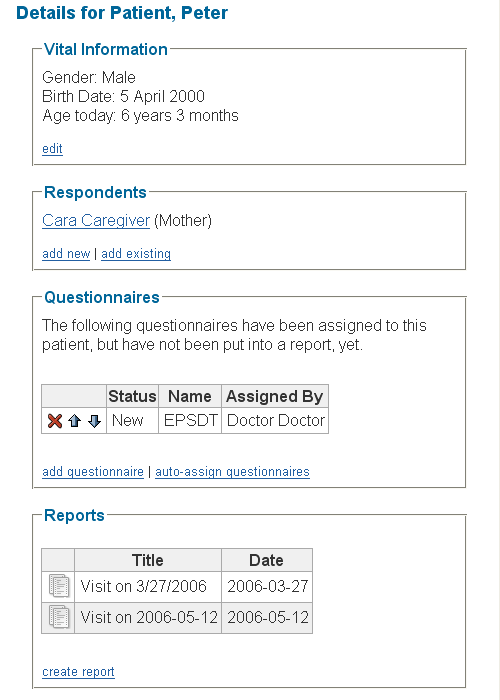
- To view the results of any questionnaires that were assigned and
completed by the parent, you must first create a report. In the
Reports section, choose create report.
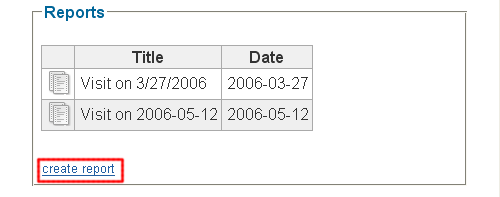
- Enter the visit type and change any other fields, like the report title
or date, if desired.
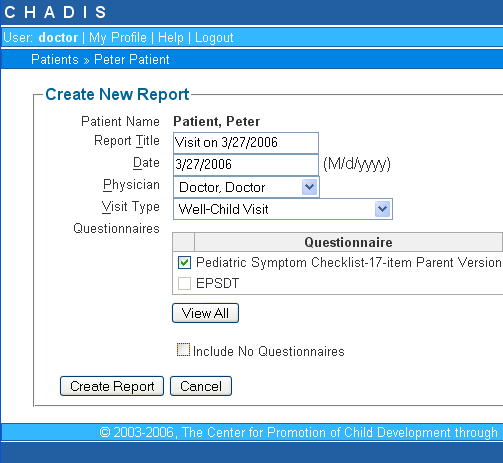
- Choose the questionnaires to include in the report. Recent questionnaires are already selected for your convenience. If you would like to include questionnaires that were previously included in a report, click on View All and you will be shown all questionnaires for that patient. You may also create a report without including any questionnaires by checking the box Include no questionnaires.
- After creating the report, you will be automatically taken to the Overview page. See below for more information about the report.
The CHADIS Report
The CHADIS Report provides a summary of the demographics and of all questionnaire results, as well as opportunities to document a physical examination and plan of care.
The report works much like any other encounter form: as you conduct the visit (or after you have finished your encounter with the patient) you can enter your notes into the spaces provided. Below is a step-by-step guide through the report.
-
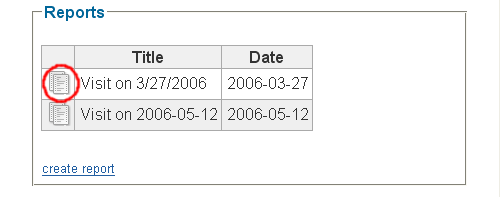
Click on the report icon to the left of the visit.
- At the top of the report is an area labeled 'Concerns'. In this space are any concerns endorsed by the respondent, as well as any items endorsed by the respondent as the best parts and most challenging parts of parenting (please note that this section is currently only relevant to infants and toddlers). You may make comments in this section (as well as most others) by clicking Make a Comment and entering your comment into the newly visible comment box.
-
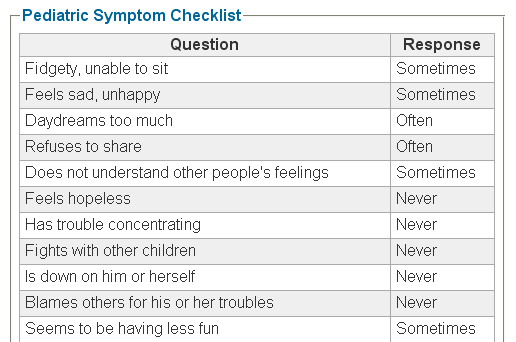
Below the 'Concerns' section is a list of the questionnaires
included in the report. If you click on the name of a questionnaire,
the responses to that particular questionnaire will be displayed
in a separate window so that you can switch back and forth between
the questionnaire responses (see example below) and the report.
- If you click on the plus sign next to the questionnaire's name, you can see who assigned the questionnaire on what date, and who completed the questionnaire on what date.
-
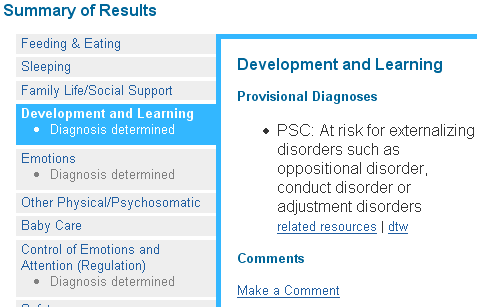
Below the list of questionnaires included in the report is a section labeled 'Summary of Results'. On the left side of this section is a list of all relevant areas of functioning (feeding & eating, sleeping, family life & social support, etc.). On the right side of the section is a blue box. If you click on a topic on the left side, the details related to that topic appear in the blue box.
If the child screened positive on any questionnaires, or if any facts were determined based upon questionnaire responses, you will be alerted by a note ('Diagnosis determined', 'Fact determined', etc.) next to the relevant topic on the left side. Click on that topic to view details within the blue box on the right. For example, if the respondent's PSC responses indicated concern regarding externalizing behavior, clicking on the Development and Learning topic on the left will result in the following text in the blue box: "PSC: At risk for externalizing disorders such as oppositional disorder, conduct disorder, or adjustment disorders".
-
Also within the blue box, you will be able to access resources to support the family. You may access resources relevant to any specific diagnoses or facts, or more genetal resources relevant to the topic selected. Resources may include programs, mentors, books, handouts, or other products or specialists to help the family and child cope with the diagnosis or concern or to promote the child's strengths. Resources also include diagnostic and treatment worksheets (DTWs) relevant to the diagnosis or broader topical area. A diagnostic and treatment worksheet (DTW) is essentially an electronic chapter for the clinician, organized in outline format with hyperlinks.
To access resources specific to the diagnosis or fact determined, click on the related resources link just above the diagnosis or fact. In either case, you will be taken to the Resource tab on the report.
For instructions for navigating the CHADIS resources, see the section on Navigating Resources on the CHADIS Report.
DTWs specific to the diagnosis or fact determined can also be accessed directly from the report. To do this, click on the dtw link next to the diagnosis or fact. To access the DTW related to the more general topic, click on the Diagnostic and Treatment Worksheet link on the right, under "Resources". In either case, you will be taken to the Resource tab on the report. To access parent or child handouts within the DTW, click the blue links to these documents.
-
Click on the Physical tab at the top of the report to record results of the physical examination. The Physical Examination page includes areas to document information regarding: medications and medication allergies; vital signs; immunization status and related orders; and the details of the physical examination itself. Within each of these sections are boxes for entering comments, or Make a Comment links which will produce text boxes in the relevant area. Save buttons are provided for saving information entered in each section. To complete the physical examination section at the bottom of the page:
- Check the boxes next to individual body parts to indicate that they were examined, or click select all in the grey area at the top of the physical exam section to indicate that all body parts were examined. The boxes were chosen to correspond to areas that need to be counted towards complexity of the physical exam by CPT requirements.
- To indicate an abnormality in a given area, check the Abnl box to the right of the given area, and enter comments as needed in the column on the far right side.
- Click on the Issues and Plan tab at the top of the report to record past problems, issues, and plans. On this part, text boxes are provided for the entry of comments regarding follow-up of past problems, issues and plans, acknowledgements made, and challenges made. At the bottom of the page are drop-down boxes and check boxes to indicate visit duration, percentage of counseling offered, and suggested time until next visit. Save this information via the Save button at the bottom of the page.
- To see a printable version of the report, including your typed notes, click on the printer icon in the top right hand corner of the report.
- To print the report so that it can be included in the patient's chart, select "print" from your browser.
Step Four: Assign Followup Questionnaires to the Patient
- To assign additional questionnaires for the parent to complete for the next visit or to monitor the patient between visits, first find the patient using the search box on the patients page.
- View the patient's details by selecting the magnifying glass icon next to the patient's name.
- Select add questionnaire.
- Choose the questionnaires you would like to assign.
Step Five: Navigating Resources on the CHADIS Report
- To narrow down your search within a topic area, you may type one or more search terms in the box at the top.
- To choose a specific resource type (e.g., book, program, info for parent (parent handout), info for clinician (DTW)), select that resource type from the drop down box next to the search box.
- To expand your search to the entire database rather than the topic area currently displayed, select in all categories button below the search box and then execute your search.
- To conduct a more general search, click on any of the links within the orange area at the top.
- To search for providers and programs based on zip code, accepted insurance, age of child, languages spoken, etc., click the switch to advanced program and provider search link under the search box.
- To view more detailed information about a resource, click the title of the resource.
- In the case of information for parents, information for children, or information for clinicians (DTWs), clicking on the URL for the handout will bring you directly to the text.
- To select a resource or handout for inclusion in a printout for the parent, click the on the button to the left of the item.
- To view the items you have selected to print out for the parent, click the link that says There are currently X selected resources in this report at the top of any page on the Resource tab in the report.
- To remove an item from the printout, click the red X next to it or click de-select all resources to remove all items from the list and start again.
- To change the order of resources on the print out, click the up and down arrows next to a particular resource.
- To print the list, click Printable View at the top of the page and then select "print" from your browser.
- To access the Resource database directly rather than from the report, please visit CHADIS Resources.